Sunday, October 10, 2010

Bloody hand window clings.

Every year the Dollar Tree has bloody hand print window clings that are really awesome. I usually buy them but they fall off of my windows several times before the holiday gets here. This year I wanted something that would stay so I mixed up some modge podge glass paint I learned to make from Gingerbread Snowflakes and made my own bloody hand prints.

You need about two table spoons of modge podge  about 30 drops of food coloring to get a good red. Mix it up well with a skewer or tooth pick, it will look pink.


Now go to the window you want to put the clings on. Dip your hand into the modge podge and get it good and covered. Now put your hand on the window in what ever way you want. You could smear it but it won't look as defined. 


You can also use the mix to put words on your windows. Just dip your finger into the paint and write what you want on the glass.

Wednesday, October 6, 2010

Ghoulish Garbage Bags


This weekend I saw some cute leaf bags printed with ghosts. I thought they were a neat alternative to the pumpkin leaf bags so I seriously considered buying them. The big problem was that they only came 2 to a bag for $1 and we have a ton of trees thus a ton of leaves. I just couldn't bring myself to pay a whole dollar for two cheap plastic bags. So I decided I would DIY some bags. 

I used basic plain white trash bags without the drawstring at the top and a king sized permanent marker. The cheaper the bag the better because the more expensive  textured bags would come out looking odd.


First unfold the bag and lay it flat with the open end facing you. The picture shows the bag open slightly but only to show that it is the open side.


Next fold up at least three inches from the bottom and tuck it under the bag. This is the portion of the bag that will be tied and anything drawn here would be lost.


Next you want to draw out your design. If you are going to draw the outlines and fill them in be sure to let the lines dry otherwise you will smear them. If you smear the ink you can wipe up your mistake if you act fast using a cleaning wipe.


The next step is to fill the bag with leaves until it is full and tie it off. You can use these guys as is or you can use them as toppers. You can also stack them to make tall ghosts or goblins. The best designs are going to be black and white unless you find colored king sized markers. If you do find them colored please drop me a line to let me know where so I can buy some for myself.

Monday, October 4, 2010

Bloody Welcome Mat


I recently saw a white bath mat with bloody foot prints all over it for eighteen dollars. Seriously its almost twenty bucks for what amounts to a ruined bath mat. After I picked my jaw up off of the floor I decided to do a welcome mat version of this on the cheap. 

I found a good plain ole welcome mat on clearance for $2 at the Dollar General and had some red paint on hand. I talked my husband into helping me because he has skinny feet that I thought would look better but you can easily do this on your own. It is as simple as stepping into a puddle of paint and then stepping onto the mat. 

I recommend doing this inside if its chilly. We did it outside which my husband griped about endlessly because it was freezing and he was barefoot and we had to clean his feet out there as well. You will need to have some way of cleaning your feet handy (lol) otherwise you'll be stuck with painted feet and no way to go anywhere until it dries.

Friday, September 24, 2010

Lumpy Primate Muffins

I really like ice cream and my favorite flavor is made by those guys from Vermont. This muffin recipe mimics that flavor. It is a banana muffin with walnuts and chocolate chips and it is awesome. I ate two of them fresh from the oven and then another one once they cooled. I think this is my favorite recipe so far. So enjoy it and drop me a line if you try it or any of my other recipes and let me know how you like them.

4 very ripe bananas
1/2 cup of chopped walnuts
1/2 cup of chocolate chips
1/2 a cup of granulated sugar
5 tbsps of butter softened
1 egg lightly beaten
1 1/2 cup of flour
1 tsp each of baking powder and baking soda
1/2 tsp of salt 
 
Preheat the oven to 350 degrees (my oven runs a little hot so I usually back off from the heat. If your oven is a little cold you might wanna go for 375) grease 10 muffin cups or line them with paper. Mash the bananas really well with a fork. It should look almost like a peanut butter consistency. Thoroughly mix the banana mash, egg, butter and sugar. Mix it until it is really well combined. Next combine all of the dry ingredients together and mix them well. Add the dry to the wet and mix it just until it is combined. Toss in the chocolate chips and nuts and mix it just enough to get them incorporated. It makes a thick batter that is almost like a wet dough. Now put an even amount of the batter in the cups and bake for about 20 minutes. Baking time will vary but you will know it is done when you put a toothpick in the center and it comes out clean. Yields 10 muffins.

Wednesday, September 22, 2010

Creepy Cloth

I've seen a lot of this stuff lately and its ridiculously priced. When you think about it that stuff at the store for 6$ a bag is basically just ripped up cheese cloth that has been dyed to look dirty. So I got some cheese cloth at my local Dollar General store and dyed it myself. All you need is some cheese cloth, left over coffee, and a pair of scissors. (A cat assistant is helpful too but not needed.) 


So you start off by opening up the package of cheese cloth. For those who don't know what it is you can find it either in the food gadget area of most stores or sometimes in the craft area. It will come on a roll or wrapped around a piece of cardboard. It kind of looks like medical gauze.

To dye it to make it look dirty you just need to soak it in either tea or coffee. Coffee is my husbands favorite drink so I made a pot for him before he went to work to get the left overs. I opened up the cheese cloth and dunked it down into a bowl of coffee and let it soak for about an hour. Then I took it out and hung it up on the shower curtain rod in my bathroom so it could dry. 

Once it was dry I took it down and unfolded it to its full width (about 3 feet across.) I hung it up in the door way to my library and went after it with a pair of scissors to shred it. I'll be using it as a back drop curtain kind of thing on my porch but you could use this technique to make a ghost, or a mummy or even a costume. My project is finished but you could take this idea and use it as a starting point for many other projects.

Monday, September 20, 2010

Cinnamon Raisin Muffins

It's official, I love muffins. This is my third muffin recipe and I'm hooked. I now look for things to try out new recipes with because I love em so much. I would rather have a muffin that pretty much any other sweet. Well maybe not chocolate chip cookies but I make those from scratch too. These are really good. They remind me a lot of cinnamon raisin bread but they are really moist. Raisin bread is always dry. I think maybe if I were being a little bad I might add a glaze to them but they don't really need it, they are plenty sweet on their own. They would also be good for breakfast or maybe even a snack.


1 17oz jar of apple butter
1 6oz package of raisins
1/2 a cup of granulated sugar
5 tbsps of butter softened
1 tsp of vanilla extract
1 egg lightly beaten
1/2 tbsp cinnamon
1 1/2 cup of flour
1 tsp each of baking powder and baking soda
1/2 tsp of salt 
 
Preheat the oven to 350 degrees (my oven runs a little hot so I usually back off from the heat. If your oven is a little cold you might wanna go for 375) grease 12 muffin cups or line them with paper. Start off by thoroughly mixing the apple butter, vanilla, egg, butter and sugar. Mix it until it is really well combined. Next combine all of the dry ingredients together and mix them well. Add the dry to the wet and mix it just until it is combined. Toss in the raisins and mix it just enough to get them incorporated. It makes a thick batter that is almost like a wet dough. Now put an even amount of the batter in the cups and bake for about 25 minutes. Baking time will vary but you will know it is done when you put a toothpick in the center and it comes out clean. Yields 12 muffins.

Wednesday, September 8, 2010

Apple Cinnamon Muffins

They say necessity is the mother of invention and it has led me to invent another muffin recipe. I had a jar of unsweetened apple sauce that none of us were eating. I swear they take sugar out of that stuff because it was actually a little sour. I tried putting cinnamon and sugar into the sauce and eating it that way but it was still icky. I decided tonight to do a muffin with it to see how that turned out. I really like it. It isn't terribly sweet but it is good. They are pretty sensible so they would make a good breakfast. They would also be good to give to teachers so that it is something that isn't a dust catcher but fits with the whole apple for teacher thing. Where did that get started anyway?


1 1/2 cup of apple sauce
1/2 a cup of granulated sugar
5 tbsps of butter softened
1 tsp of vanilla extract
1 egg lightly beaten
1 tbsp cinnamon
1 1/2 cup of flour
1 tsp each of baking powder and baking soda
1/2 tsp of salt
Cinnamon sugar (optional)


Preheat the oven to 350 degrees (my oven runs a little hot so I usually back off from the heat. If your oven is a little cold you might wanna go for 375) grease 12 muffin cups or line them with paper. Start off by thoroughly mixing the apple sauce, vanilla, egg, butter and sugar. Mix it until it is really well combined. Next combine all of the dry ingredients together and mix them well. Add the dry to the wet and mix it just until it is combined. It makes a thick batter. Now put an even amount of the batter in the cups and bake for about 20 minutes. Baking time will vary but you will know it is done when you put a toothpick in the center and it comes out clean. Sprinkle with cinnamon sugar while they are still hot. Yields 12 muffins.

Monday, September 6, 2010

Jar o' Lanterns

I dunno about anyone else but I hate carving pumpkins into Jack o' Lanterns. They feel and smell gross and they start to mold faster than the failed science experiments in the back of my fridge. I like the tradition of a Jack o' Lantern though, so I decided that I would make some faux ones to decorate my porch with this Halloween. I started by gathering up an assortment of glass jars about a month ago. I even bought things in a glass jar that I would normally have bought in a plastic jars or cans to get the jars for this project. BTW buying the glass jar is actually cheaper sometimes... who knew. Anyway the other materials needed for the project are contact paper, scissors, marker or pen, votive candles and orange spray paint .

First you need clean all the jars and scrape off the labels.  I found that if I soaked the jars in really hot water with a little soap in it that I could easily scrape off the labels with a scrubber. Let them dry thoroughly before you try to paint them. Next you need to make faces with the contact paper. I held the paper up to the jar to get an idea of how much space I had to work with then I free handed a Jack o' Lantern face onto the contact paper and cut it out. Peel and stick the face onto the jar in the arrangement that you like. 

Next you need to spray paint it. The paint I got is fast drying which is awesome. For it you only had to wait 1 minute between coats but for regular paint (which I couldn't find in orange) you would wait ten minutes between coats. Spray an even coat all around the jar then repeat until you have it completely coated. 

When the paint is dry, mine took ten minutes but most take one hour, peel off the contact paper and look at your lovely Jar o' Lantern. I couldn't get a good "night time" shot of these but you put votive candle inside of them so that they glow like a real Jack o' Lantern.

Wednesday, August 11, 2010

Peanut Butter Banana Nutter Muffins

This recipe came out of frustration. I had saved two bananas so that they could ripen for me to make some muffins with. When I figured they were ripe enough I went to the net looking for a recipe. I kept running into a couple of problems though. First off most of the recipes I found needed more bananas than I had. If it called for just two bananas it also called for milk which I was out of. So I thought for a while about what I could do. I remembered a basic muffin recipe I had come up with a while back and figured I could tweak it enough to suit my needs for this batch of muffins. I figured that peanut butter would be as dense as bananas so I got the jar out. The peanut butter is a stronger flavor at first but then the banana starts to come through and it winds up tasting like a peanut butter and banana sandwich.

Ingredients:
2 ripe bananas mashed
1/2 a cup of peanut butter
1/2 a cup of granulated sugar
5 tbsps of butter softened
1 tsp of vanilla extract
1 egg lightly beaten
1 1/2 cup of flour
1 tsp each of baking powder and baking soda
1/2 tsp of salt
1/2 to 2/3 of a cup of chopped nuts (I used walnuts but peanuts or pecans would be good too)
Preheat the oven to 350 degrees (my oven runs a little hot so I usually back off from the heat. If your oven is a little cold you might wanna go for 375) grease 12 muffin cups or line them with paper. Start off by thoroughly mixing the banana, vanilla and peanut butter then add in the egg butter and sugar. Mix it until it is really well combined. Next combine all of the dry ingredients together and mix them well. Add the dry to the wet and mix it just until it is combined. It makes a thick batter and it kinda looks like whipped peanut butter. Now put an even amount of the batter in the cups and bake for about 20 minutes. Baking time will vary but you will know it is done if when you put a toothpick in the center it comes out clean. Yields 12 muffins.

Monday, July 26, 2010

Envelope pillow cover/ Awesome sewing videos

This is an update on my adventures in sewing. I have accomplished a little bit in the sewing world so far. I read about a lot of skills in my Dummies guide but it wasn't really real for me. I realized about half way through the book that reading a book to teach me how to sew was going to work about as well as reading a book to learn how to crochet did. In a word it didn't. I was having the same problem as before. The flat drawing doesn't translate to anything tangible in my head. 

So once I figure out that the book wasn't going to help me as much as I thought it would I did the same thing I did when I wanted to learn how to crochet. I found a video on youtube. A series of videos actually. They are made by Vanessa at craftygemini.com. If you are a newbie like me I recommend you go to her channel on youtube and sort her videos by date added. Start at the beginning. She shares so much useful information from pressing -not ironing- to making cutting easier. I felt pretty confident just from watching her do it. She is a really good teacher. She doesn't just make it look easy. She so thoroughly and thoughtfully explains the steps that if you follow her and listen to all of her advice it becomes easy.

I have watched all of her videos and decided that her envelope pillow cover was going to be my first real project. I tried her bib one the minute I saw the video (before I watched them all) and I messed it up. I'll be making a new one soon though, now that I know a few things. 

So far I have made two of these covers. One for each of my two middle nieces, Erica and Elizabeth. Elizabeth was here spending the night when I made her pillow. She took off with it before I got a picture of it but I took a pic of a scrap of the fabric I used. Hers was a pink and black tiger print and Erica's is a purple (she calls it rockstar purple) leopard print. 

I am also going to make some Elvis Presly ones. I found some fabric in the $2 dollar bin that has Elvis in various poses from Jail House Rock on colored backgrounds. I'm going to get some plain black fabric to be the backs of these. My brother and my aunt are huge Elvis fans so they will be getting a set each.

I had to make the pillows that went with this project because I couldn't find any pillow forms. I cut two 13x13 inch pieces of fabric from some white cotton I had had forever. I stitched along all sides leaving an opening for stuffing. I stuffed then I hand sewed it shut. They aren't as flat and uniform as the ones you can buy ready made. I'm sure there is a way to make them flat and uniform but I dunno what it is. If anyone does leave me a comment please :D

Friday, July 16, 2010

Stick a pin in him cause he is done...

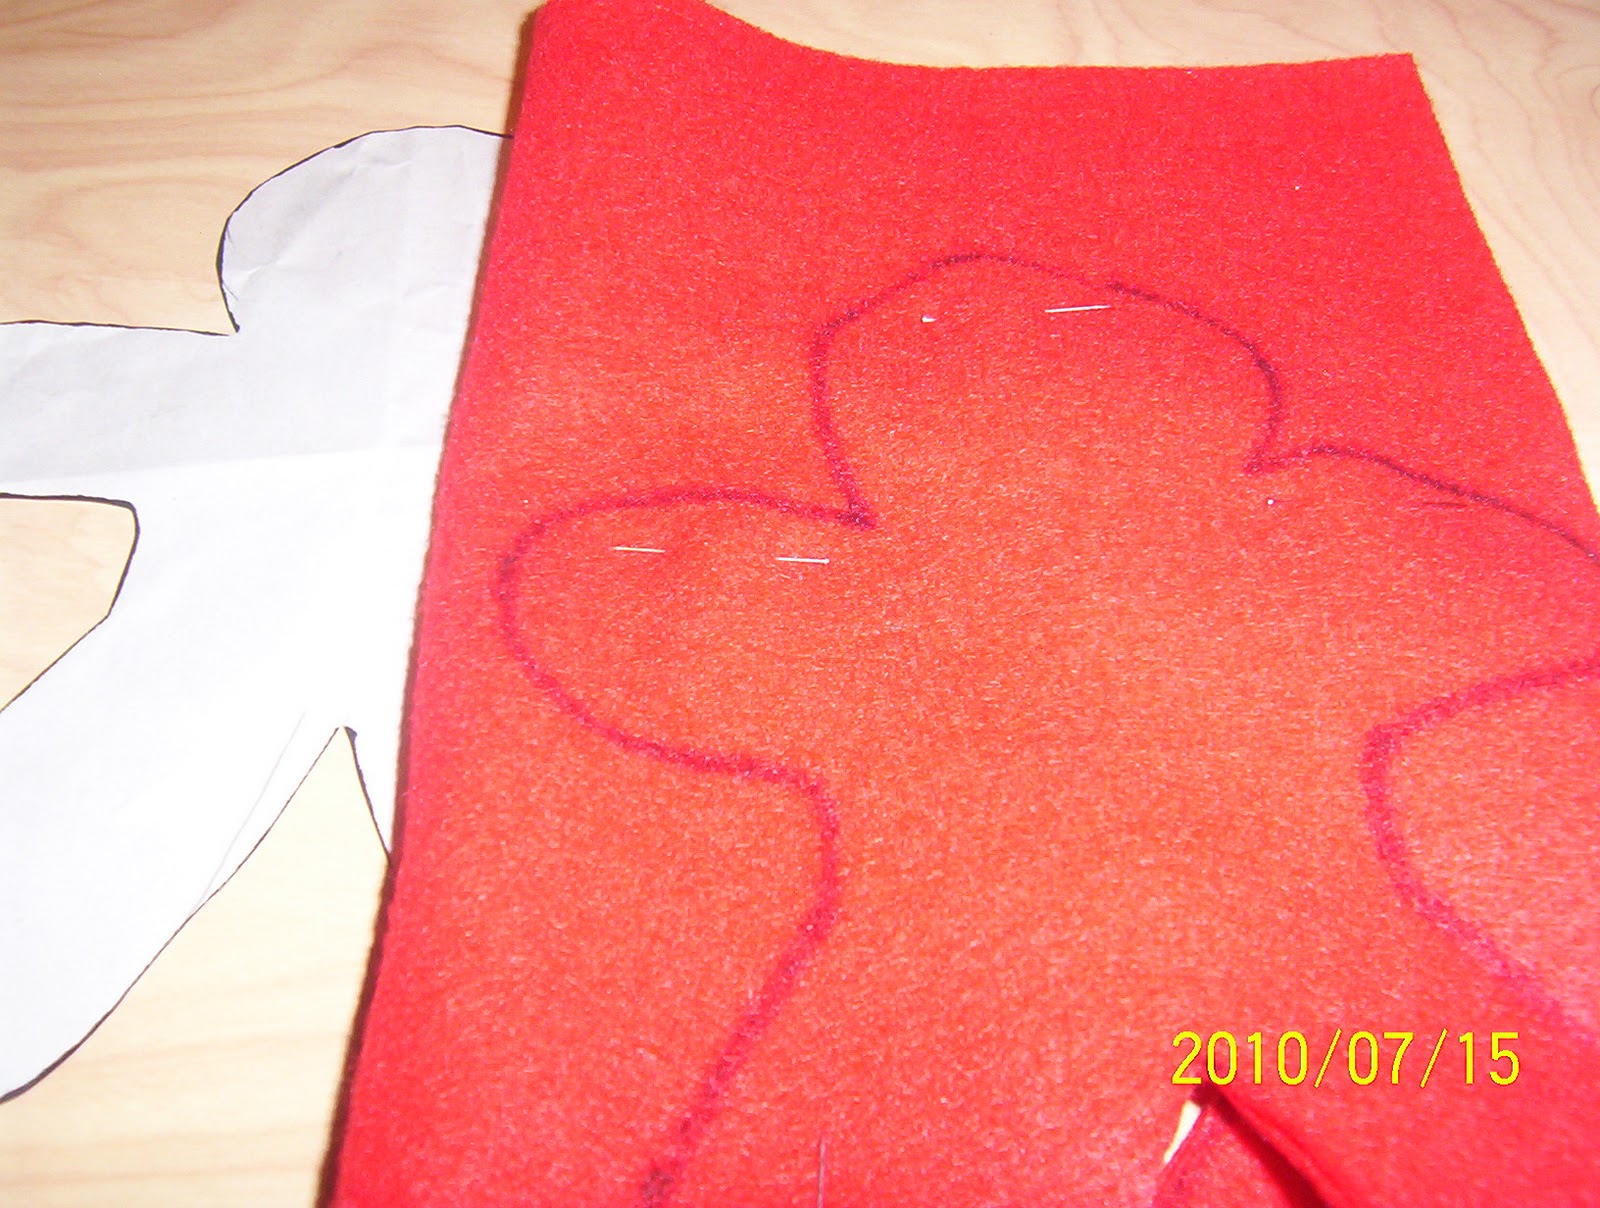
As promised I'm delivering a fast, cute and easy hand sewn pin cushion. He is really cute and I think I'm now addicted to felt and pin cushions because I have a ton of ideas for then now :) Without further ado I give you my Voodoo doll pin cushion:

He is made from plain old craft felt that you get in packs of 12 colorful sheets that are 8X11" I believe. An added bonus is that the brand I got is made from 100% post consumer recycled bottles. So not only is he cute and functional he is also environmentally conscious. Other materials you will need are heavy thread like crochet thread, a small amount of embroidery floss (optional) paper for a template and some stuffing of your choice. The thread I used is recycled from my cat's food bags. They are sewn shut with this red thread. I have been saving it for a while figuring I could use it eventually.


So to start off you need to make your template. I'm possibly going to be adding one here but if not free hand it or find a gingerbread man shape and print one out. It needs to fit onto a piece of felt folded in half. Trace it onto your felt with a sharpie. Be sure you aren't wasting felt you can use the scrap for other projects later.


Now you need to cut it out but to make it easier pin it first. This will keep the two sides from shifting causing unevenness in your cuts. Pin inside the lines like you would if sewing so that you don't have to re-pin later. Now cut it out using good sharp scissors. Cut on the inside of the marker line so it disappears.


Here is a shot of the thread I used.
Before you start sewing you need to put his face on him. I used plain black embroidery floss and sewed on x's for eyes and a stitched up mouth. You can get creative with the face if you want. I thought about google eyes and other embellishments or drawing the face on with markers but to me a voodoo doll is supposed to look primitive. With that in mind I went with simple stitching.

Once you have the face on you need to start sewing him up. I dunno if the stitch I used has a name or not but I did it that way to keep up the primitive look. As long as he is together and the stuffing is in no danger of falling out stitch it what ever way you like. Leave a small opening for stuffing. Fill him up pretty well. The sturdier he is the better he is gonna hold onto pins. Once you have him full stitch him up and clean up your threads. Now viola you have a voodoo doll pin cushion.


Here is the template. Print it with the dimensions 8 inches tall and 5.5 inches wide.

Thursday, July 15, 2010

Cocoa Krispies Treats

I like baking cookies but in the summer when it is really hot no one wants to have the oven on long enough to bake 5 dozen cookies. So what's a girl to do when she wants some home made chocolaty goodness? Cocoa Pebbles (or their generic counterpart) and marshmallows came to mind today. The recipe I used is a standard Rice Krispies treat recipe. Since I'm a big Good Eats fan I'll do this AB style.


Hardware: One sauce pan in the two to four quart range. One large bowl, bigger than you think you need so that you have room to really move the cereal around when you are stirring. One silicone spatula that can take high heat. One 8X8 baking dish. And last but not least, because if you skip it you won't be getting your Cocoa Krispies Treats out of the pan, some non stick spray. Yes it is hardware since we are using it as a tool rather than an ingredient.


Software: Three cups of Cocoa Pebbles or any generic counterpart, 1 1/2 tablespoons of margarine and 2 1/2 cups of mini marshmallows.


Start off by pre-measuring everything, greasing your pan with the non stick spray and pouring your cereal into your mixing bowl. Oh and do yourself a favor and spray the nonstick stuff over the sink, it is really slick and you can slip on it easily. Then over very low heat melt the margarine completely. Next put the marshmallows in the pan and melt them completely stirring frequently. You will know that they are completely melted because it will look smooth like marshmallow fluff. Once that is done you will have to work quickly because the marshmallow will set up pretty fast. Pour the marshmallow into the cereal and mix it together well. Pour it into the greased baking dish and press it down flat and evenly with your spatula. You may need to use a clean greased spatula to get the job done if it sticks too much. Let it cool completely and then cut into 16 squares. Oh and then enjoy :D

Wednesday, July 14, 2010

Adventures in Sewing

Anyone who has read my blog, if anyone has read my blog, knows that I am not trusted with sewing machines. I thought I knew how to sew. In fact I generally said "I know how to sew!" shortly before breaking the sewing machine every time I broke one (three.....or four times so far.) I did have a sort of sewing class in high school. We learned how to sew a seam and sew on buttons and basic stuff. I guess that wasn't enough though. So I recently decided that I don't wanna break sewing machines anymore and I want to be trusted with them. I picked up the book Sewing for Dummies 2nd Edition by Jan Saunders Maresh. So far I have learned a pretty good bit and I have some great ideas for very low sew projects to do to get my feet wet again. I also just came up with a neat idea for a hand sewn pin cushion which I'll be posting a tute for when I make it. My mom is going to let me sew on her machine while she watches eagle eyed over my shoulder to make sure I don't break another one. I'll be posting my progress as I learn along with my usual crafts.

Monday, June 28, 2010

Hanging Pocket Organizer

I have been struggling with having too much junk laying on my desk for a long while now. I decided to remedy that problem recently and set about looking for storage and organization methods I could use. While I was at my favorite Dollar Tree the other day I saw a long bamboo rod and I started thinking. I then found some ribbon not far away from the bamboo and when I came across the place mats I figured it all out. I realized that I could make a modular organizer with this stuff pretty easily. I got everything  at the dollar store except for the hooks that the rod is held up by. I used one bamboo rod, one roll of satin ribbon, 4 place mats and a two pack of large wall hooks.

Two of the pockets are just one place mat folded in half and sewn up on either side. The middle one with the pockets is two place mats. I took the backing off of one and ironed in a half inch seam on the top and bottom of each pocket which my mom then sewed for me (I'm still not trusted with sewing machines lol.) Then she sewed the ribbons on with a strong box stitch. She also sewed two loops of ribbons for hanging things like my husbands ginormous headphones onto the rod with. To do that you just sew a loop then sew a strip across the middle. Easy peasy and I spent eight dollars total for it.

Saturday, June 12, 2010

This Is The Afghan That Never Ends..........


I found this afghan kit at the good will one day in February just browsing around. I thought it was pretty and that it would make a great project to play around with. I came to hate this afghan eventually. I started it on February 20th and just finished it thirty minutes before midnight on June 12th. It was maddening. I have never had a project take so long. I have in fact made afghans similar in size to this one in just a few days. The problem with this was the size of the yarn. It was thin two ply yarn. It took me half an hour to finish just one row. I will never make anything this size with yarn this thin ever again. I will make more chevron afghans though because the pattern is so easy but so pretty. Anyway thought I would share my finished project and announce that I am finally free of that thing yay :D

Thursday, June 10, 2010

Chalk Board T-shirt.

Remember the fad a few years ago with shirts that had velcro strips on them that you could attach velcro letters to so that you could personalize your shirt? I remembered it and was thinking my nieces would enjoy those shirts. Then I remembered how just about everyone lost the letters and how the velcro started looking a little manky after a few wears and washes. So I put that on the shelf and started thinking of different ways of making shirts that can be personalized and re-personalized. I came up with a shirt that you could write on, then erase and write on it again. I used a plain ole cotton t-shirt (I actually bought it at the Dollar Tree) a foam brush, a piece of cardboard that fits inside the shirt, blue painters tape and some chalk board paint from the craft store. I dunno if the paint in the hardware section is the same as the paint in crafts but the one I got said it would work on most porous surfaces.

Anywhoodles to get started you need to wash your t-shirt on a regular cycle then dry it. Next you'll want to put the cardboard inside the shirt and tape out a rectangle on the front of the shirt with the painters tape. I eye balled it but you can measure if you want. Make sure the tape is pressed down really well also because if it isn't the paint will bleed under it and you won't have clear lines. You can see in the pic that I had a spot where that happened. Now you just need to paint the chalkboard on evenly over the rectangle. Let it dry then do a second even coat and let that dry for 24 hours. Now get a piece of chalk and go over the whole rectangle covering it with chalk and then wash the shirt again on your gentlest cycle. After that you can write any message you want on the shirt. I wrote an ode to my favorite blog for this picture.

Sunday, May 16, 2010

Fast cheap and easy framed art from the dollar store.


Today was my 9th wedding anniversary and to celebrate we went out to eat at our favorite Chinese place. There just happens to be a Dollar Tree next door to said place where we walked around to build up an appetite. ;) I am working on two long winded crochet afghan projects right now but I was getting bored with crochet. Because of that I wanted a project that would be fast and not take too much time away from those things but would give me something else to do creatively. I looked and looked and couldn't really find anything that would be fast until I came across these unfinished document frames and some acrylic paints. I picked them up thinking I could do something with them but not sure what that something was. Then I found this really great gift bag with a painting of a bunch of folks dancing and having a good time outside of the Apollo. It was vibrant and graphic and I knew that I had to have it. Then the idea hit me, I could frame that art and hang it on my wall to enjoy whenever I wanted. I found a lot of bags with very interesting and pretty artwork on them. There were three or four of them with several little girls in Edwardian style clothing. They were doing various little girl things like having tea parties or playing dress up. They would be very cute in a little girls bedroom. I did two pictures that were both in a sort of music theme. The jazzy one at the Apollo and the one of a dancer.

First off, sorry for the quality of the pictures. I used my cell phone camera because the batteries in the regular camera were dead. OK you will need a frame, paints, a gift bag of course, a pen or pencil, some scissors, paint brushes and paper towels. The process was really easy. First you unwrap everything and take the frame apart. You also need to prep the bag by cutting out the string that is used as a handle (if it is made with one.) Next you need to lay the glass onto the bag and figure out where you are going to cut it. Using my paint brush program I drew a line around the glass in this pic so you can see it better here. The thing you want to do is get the most interesting parts of the picture into the frame. I think the people in this one are far more interesting than the car so I positioned the glass to show them. Next you want to trace around the glass and then cut the picture out. Cut on the inside of the lines so that you don't end up with a piece of paper that is too big for the frame. It may be easier to cut out on the sides of the bag leaving a big margin and then trim it out. I framed the picture before painting the frame so that I could make sure my paint matched the picture but you can paint it separately. To frame the picture you need to put the glass back into the frame and then put the backer onto it. Make sure that the hanger is facing up and that you get all of the tabs pushed down. (see pic 1)

Ok now for the painting. I used acrylic paint for this but I watered it down to make a stain. I mixed red with pink to get a rosier color that matches the neon sign in the picture. I used an upside down sour cream container lid as my palette. (see pic 2) To use it as a stain you need to work in small patches and go quickly. First you brush the paint on then you wipe it back off. This will make the color a little lighter so keep that in mind when you are selecting or mixing your paint. The benefit to staining is that once you wipe the paint it is pretty much dry. Once you have finished staining make sure the glass is clean (if you framed the picture first.) Then hang it and enjoy.
Pic 1:
Pic 2


Sunday, May 2, 2010

Felicity Scarf


Worsted weight yarn (Delft Blue super saver) size K hook. Gauge isn't important.

Ch 21

Row 1: Dc in the 4th ch from the hook. DC in the next 2 ch's* ch 1 sk the next ch Dc in the next 4 ch's. Repeat from * 2 more times.

Row 2: Ch 3 turn * 4 DC in the next ch 1 space ch 1. Repeat from * 2 times. Ch 1 DC in the top of the last DC

Row 3 Ch 3 turn. 3 DC in the 1st ch space. * Ch1 4 DC in the next ch space. Repeat from * 1 more time. Ch 1 3 DC in the next ch space 1 DC in the top f the last DC.

Repeat rows 2& 3 until scarf measures 6 ft in length. End with Row 3.

Finishing: SC evenly around the scarf working 3 sc in the corners. Slst in the 1st st to end. Weave in ends. Cut 120 16 inch pieces of yarn to make the fringe using 12 strands in each hole.